by Stacey Wiseman | Jul 10, 2017 | BookWright, Family Photographs, Photo Book Design Layout, Q&A, Tutorial
I want to start from the beginning of this post with the acknowledgement that adding color to your photo book can be a tricky and ultimately, it is a personal preference. There is no right or wrong answer. But I also understand it’s common to seek advice or suggestions on possible ways to attempt color. So when a
Photo Book Club member asked me this question, I thought it would be a perfect time to address my thoughts in a blog post.
White Background versus Black Background
My personal preference is for a plain white background because it conveys a clean, fresh, modern look to my photo books. Because I frequently incorporate a mix of color and black/white photographs, the white background appears more neutral.
When I’ve seen successful photo books with a black background, it’s typically for books containing a majority of black and white photos with high contrast – or – to create photo books a dramatic, enveloping mood. With a black background, it is easier to establish a high level of contrast or striking difference between the photos and the page.
An easy way to think about this is with interior spaces. I’m sure if you’ve been around pinterest, picked up an interior design magazine or watched HGTV at all, you’ve seen light and airy living rooms with clean white walls and maybe you’ve come across a more dramatic living room with dark walls. (And of course, all of the varying shades of paint color in between….but for this example, I want to stick with the extreme ends of the spectrum.)
Look at these two examples below found on pinterest. Are you immediately drawn to one example? What do you like about it? What feeling or emotion does it invoke? Or if you are indecisive like me and feel drawn to both – what are the characteristics of each that you like and how does that start to shape your vision?
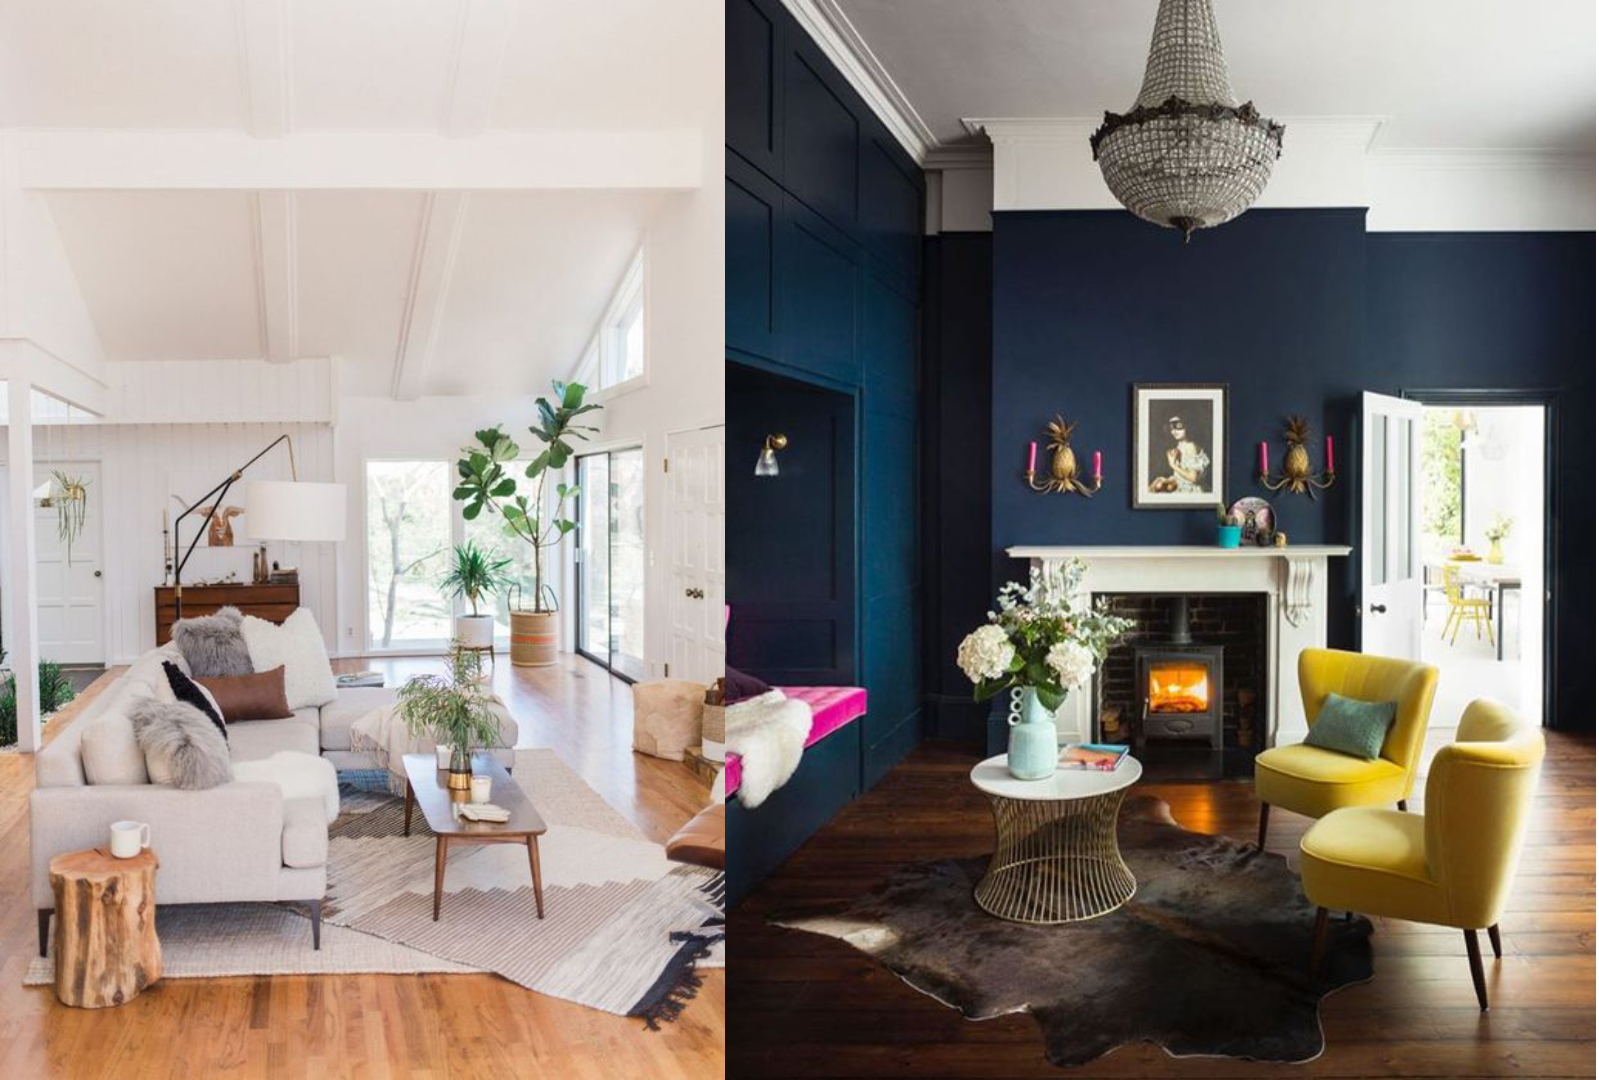
As you’ll notice, both examples work yet they illustrate a different vision. And this is what is great about photo books because you can create different moods or visions based on the content or photographs.
For example, if you’ve returned from a tropical vacation and wanted to make a travel book of your photos, chances are you’d have a lot of colorful, vibrant photos. The colors in the photos may pop more against a white background. A black background may overwhelm the photos.
On the other hand, if you wanted to make a photo book of your street photography, those photos may have a high degree of contrast and stark divisions between the bright whites and deep blacks. A black background will help ground and immerse the photos and almost create a more intimate experience in which to view photos.
Comparing White and Black Backgrounds
However, things are not always immediately black and white. In my
Photo Book Club, I have a video sharing three photo book examples that flip the advice in the previous section on it’s head. Just because something may be the norm does not mean it’s the absolute.
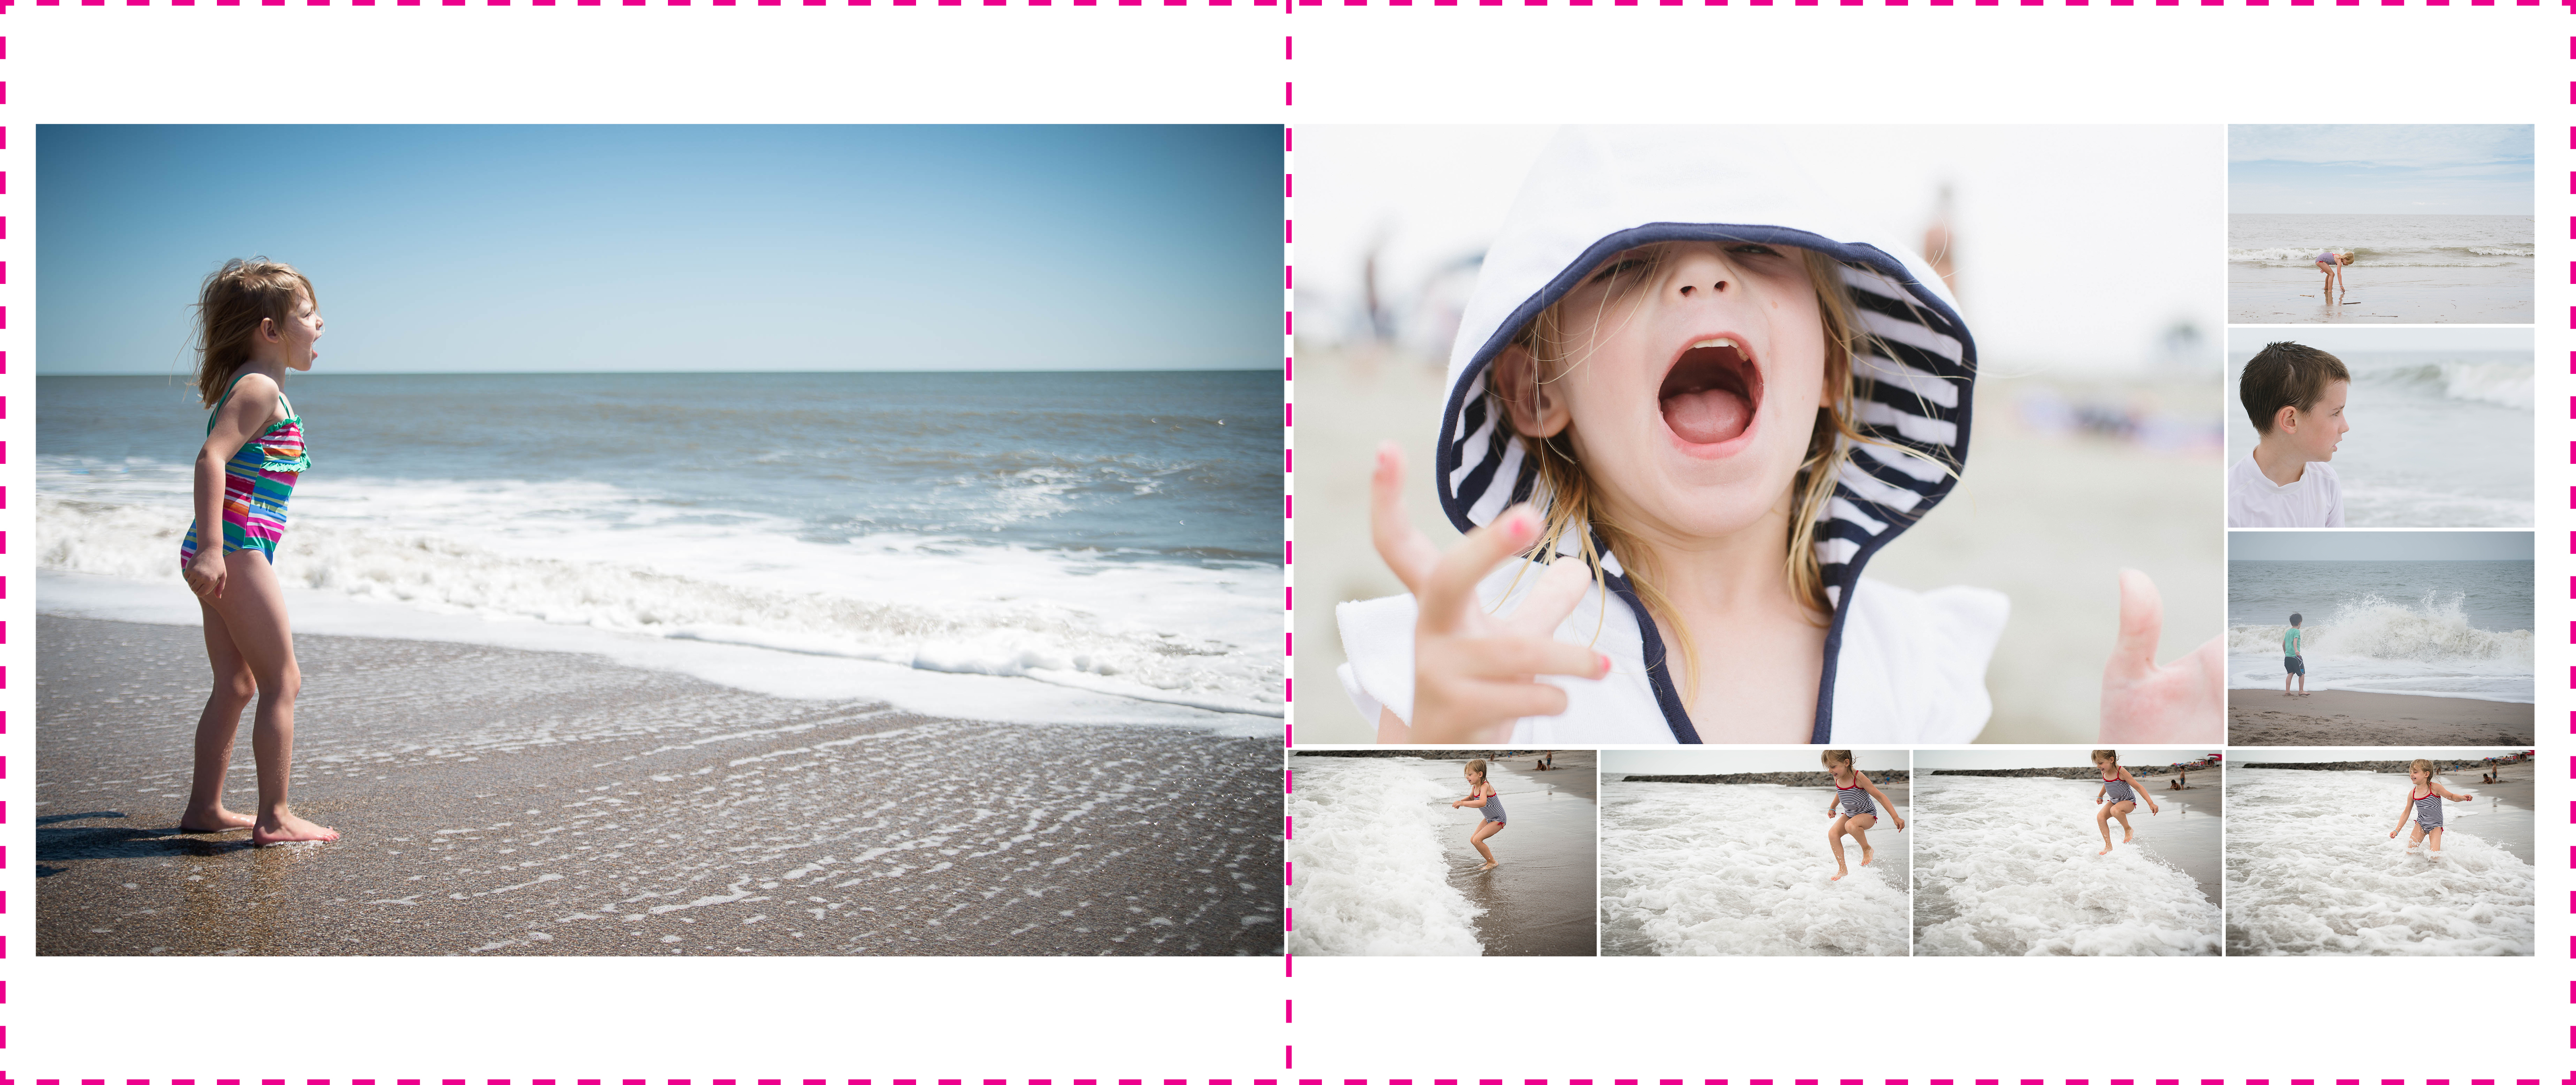
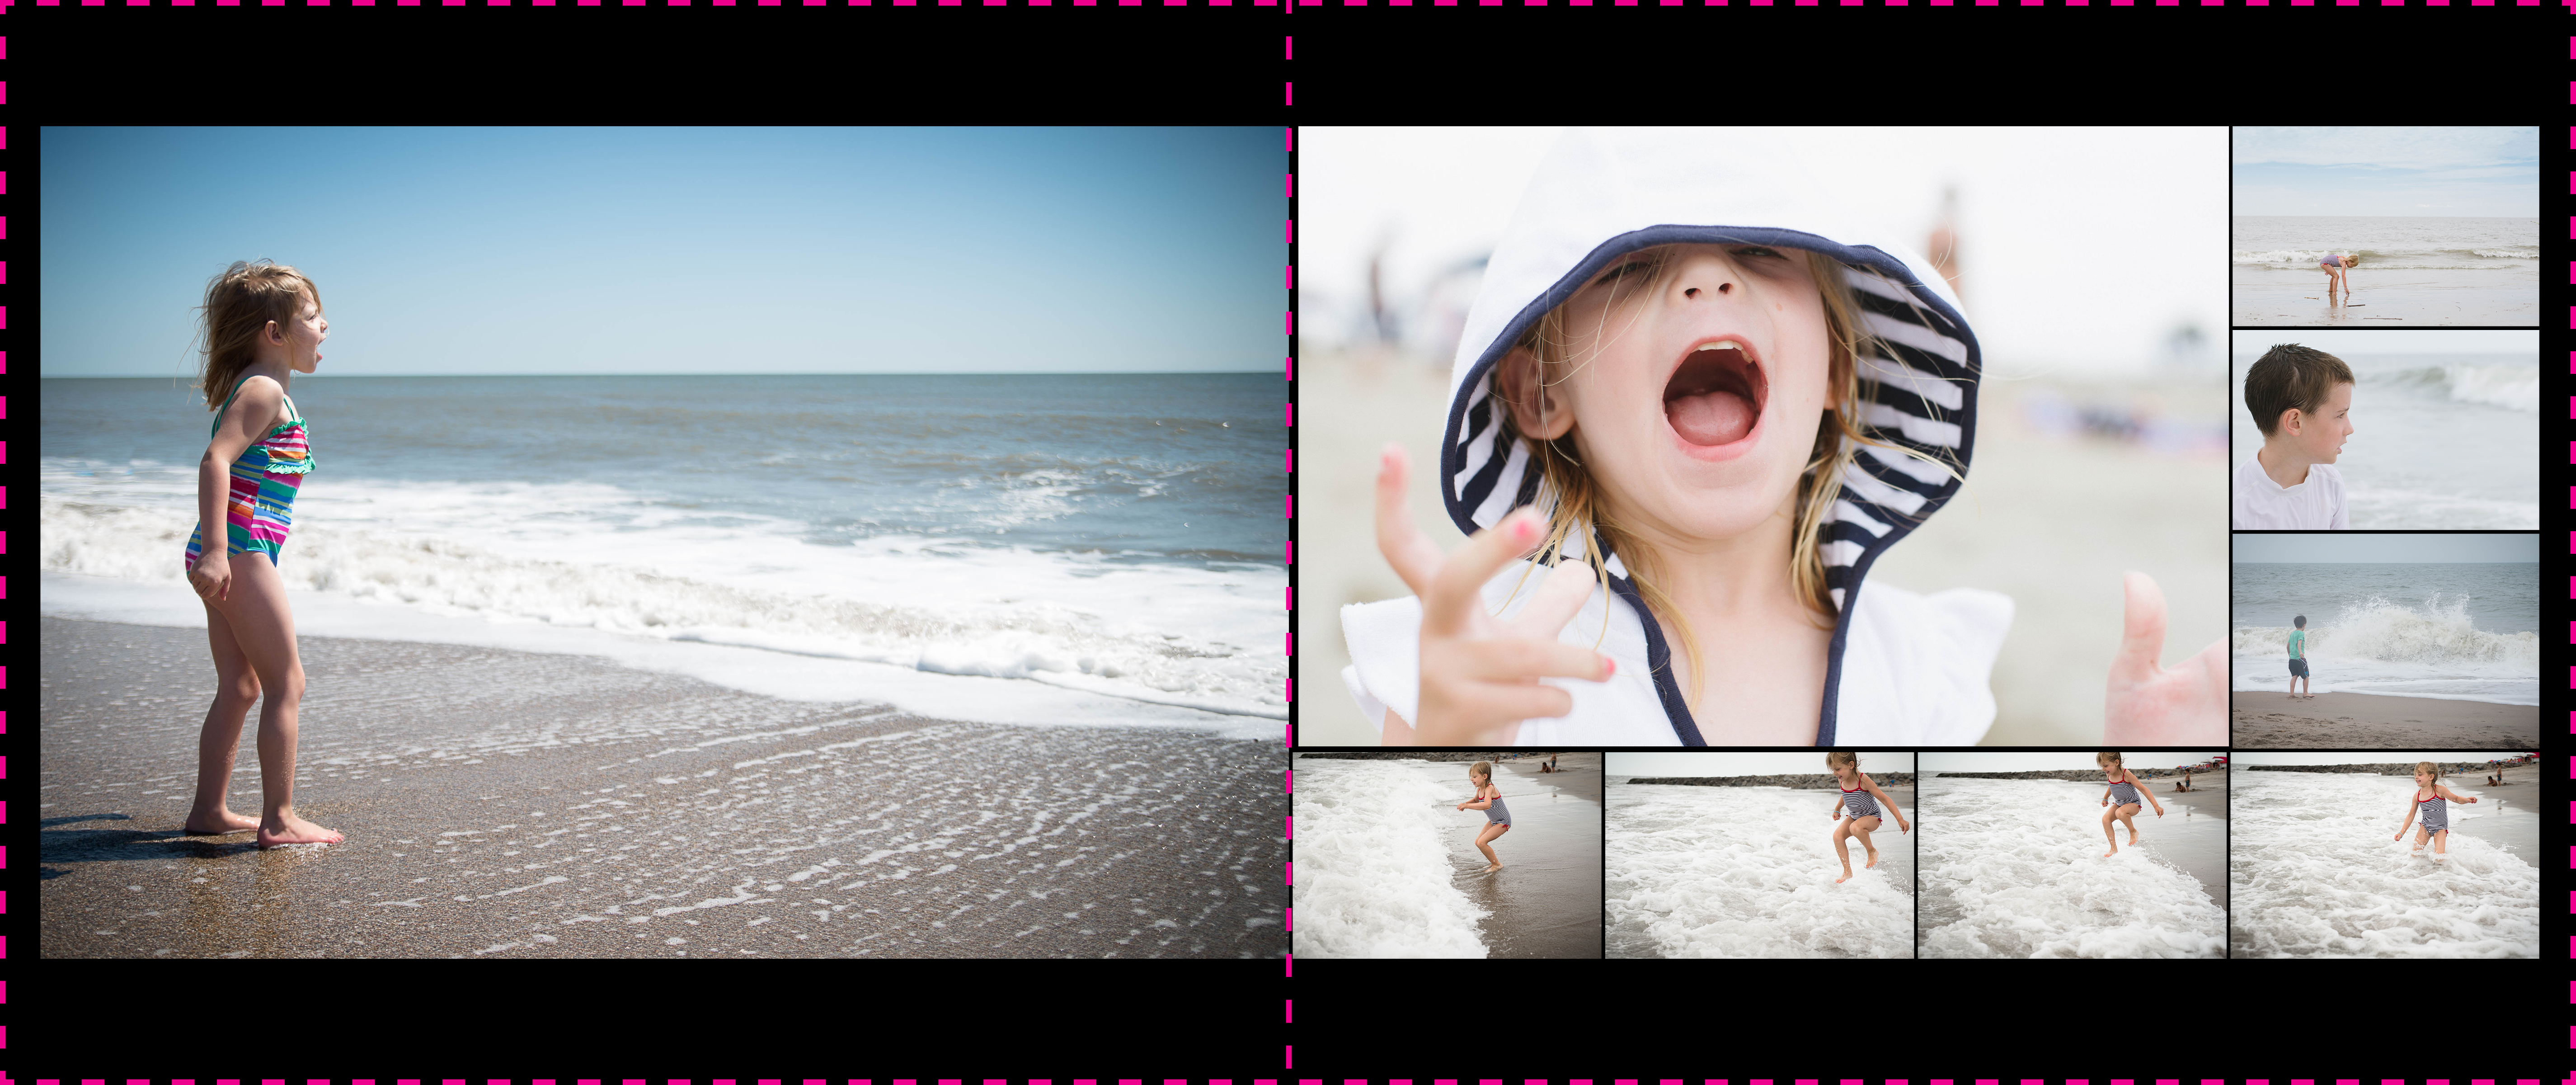
As I mentioned at the beginning, using color really does come down to personal preference. So, I thought it would be fun to share two layouts with both a white and a black background for you to determine what you think works best.
Creative Use for a Color Background
If you prefer white backgrounds but want to try color or a color variation on some pages, a great idea is to create a color section of your annual book to highlight a vacation or a particular photography project. This sets these pages apart from the rest of your photo book without having to commit completely to a particular color.
The great thing about using a color background on important pages, particularly if it covers a decent amount of spreads, you’ll be able to quickly find this section of your photo book by looking at the edge of the book.
In my recently released Catalog Collection photo book template, I spent quite a bit of time analyzing catalogs and one of the things I noticed in a J. Crew catalog was their use of a white background for the pages featuring women’s clothing. For the men’s clothing, the pages had a small black border around the edge of the page. It created a bit of separation without it becoming too apparent. True to their brand, it was classic, refined, structured, and intentional.
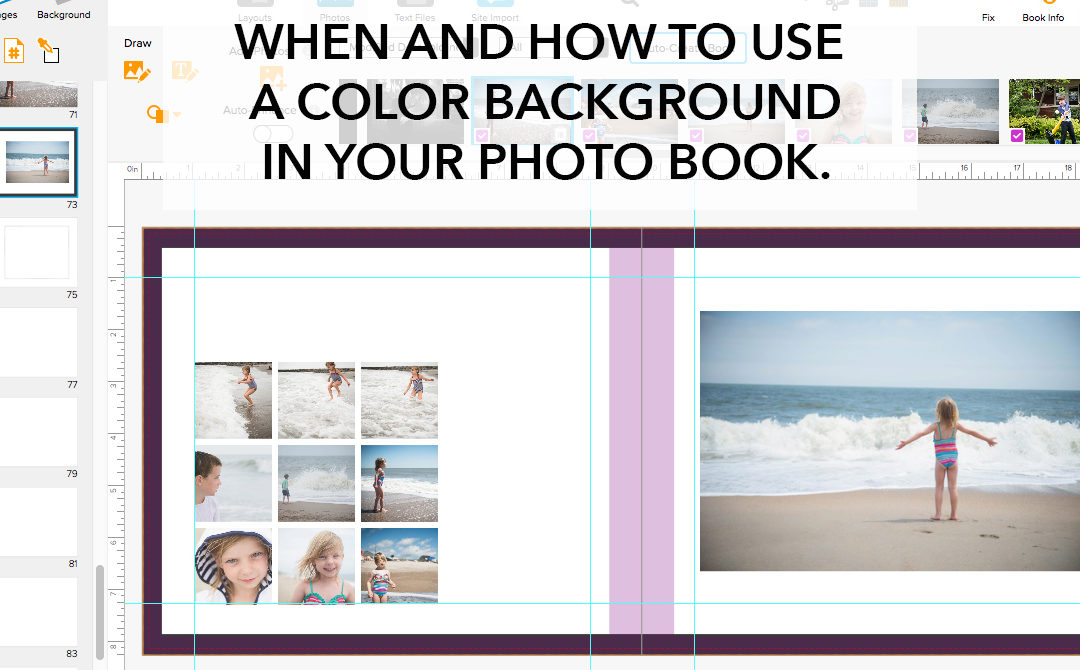
How to Add a Color Background
Now that we’ve covered why and when to use color backgrounds, the next step is to help you with how to add a color background to your photo book. In this video tutorial, I’m showing how you can create a color background in BookWright and InDesign.
by Stacey Wiseman | Feb 19, 2014 | Photo Book Design Layout, Q&A, Tutorial

Question: What is a spread?
[divider] Answer: Oh – great question! This is a little more technical of a question when it comes to the book design process. If you are brand new to making, designing or custom design services for photo books, you may come across this term and think, “What in the world is a spread?”
[divider] With books, a spread refers to the pages of a book laid open with both the left and right page showing.
[divider] So why is this important…well, when you are designing books, the typical default is usually to see and design one page at a time.
[divider]
[divider] But, why would we design one page at a time when we actually see the pages together when we are experiencing the actual book. You’ll see great improvements in your layout design when you can design with the spread in mind.
[divider] Yep, paying attention to a book spread, immediately ups the game on your photo book layouts!
[Click it Tweet][divider] Look for a tool to view the spread as you are designing.
[divider]

[divider] Without paying attention to the spread, you could design a layout that looks like this:
[divider

[divider] Not terrible…but it could be better. Nothing feels together and well-thought out with this design.
[divider] By paying attention to both the left and right page, we can begin to align the bottom edge of the photo to create a layout like this:
[divider]

[divider] And if we are really looking for a layout that fully considers the spread and create a story between the two pages, we could create a layout like this:
[divider]
[divider] All because I was designing with the spread in mind.
[divider] I’d love to hear from you, what question do you have about book design? Leave your question in the comments below!
by Stacey Wiseman | Jan 19, 2014 | Q&A
It’s time for another photo book Q&A…and being January…this happens to be a timely one! 😉
Q: I really, really, really want to stay organized and on top of my photo book this year. Any suggestions?
[divider] A: YES! Ah, the new year. Ambitious goals that you really want to stick to…Here’s the thing…to really make sure you follow through, it has to become habit. So really spend the next 30-60 days paying attention to your intentions and goals. Do them, even if you feel like you’ve got it covered. Form the habit now!
[divider] Here is my go-to plan for staying on top of your photo book this year.
[divider] 1. Shoot at least weekly.
I applaud all of you who can shoot everyday. It’s just not right for me and my schedule. That being said, I make sure I get out my camera at least once a week…usually it’s 4-5 days a week. If you want a book that documents your life, your year; you’ve got to keep the camera accessible each week to capture the variety.
[divider] 2. Have specific projects or goals to work on throughout the year.
Working on a specific project or themes each month really helps you focus on what to shoot. There are numerous projects and themes out there. I’ve seen Project 52 themes, Letters to our Sons/Daughters, or getting in the frame with your kids. Select which one is right for you. And be sure not to overwhelm yourself. 😉
[divider] 3. Capture high and low.
I’m not talking about your position here, although that’s a great tip too! Great annual photo books balance the beautiful and candid moments in life. It’s definitely great to have photos that you want to feature large – photos that you are proud of as a photographer. But it’s also important to get those moments that may not in best light or best composition, too.
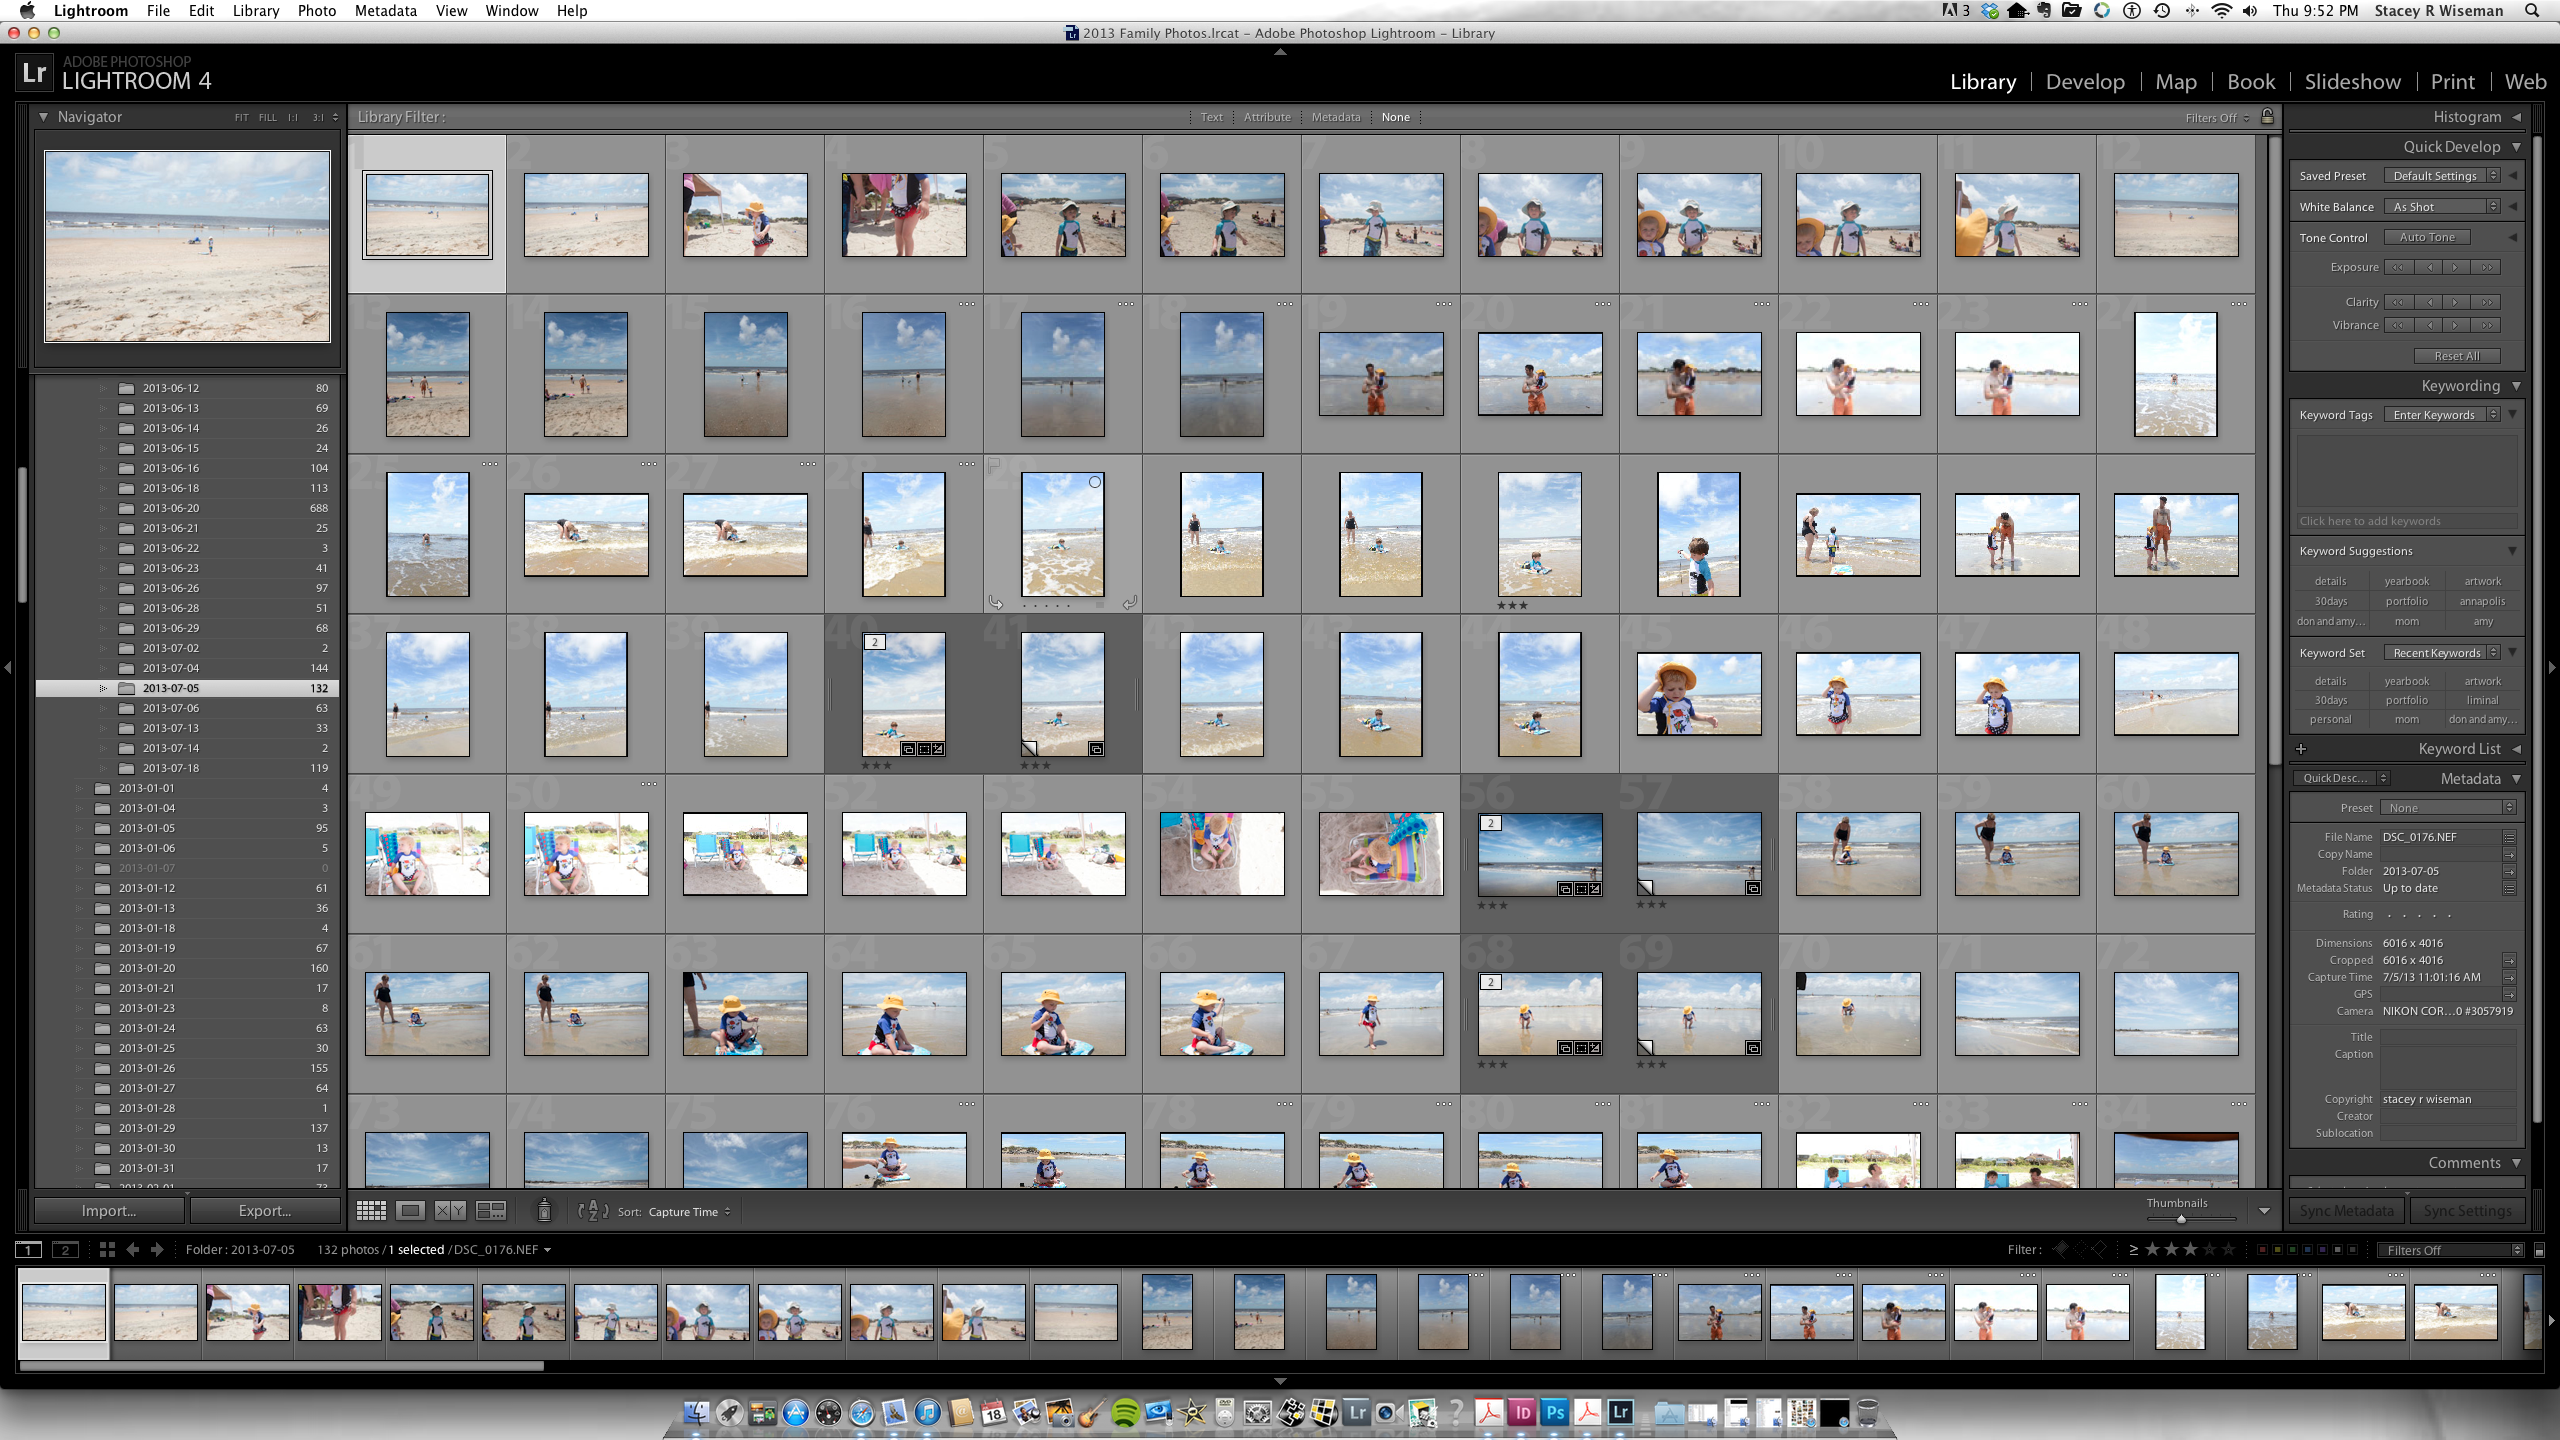
[divider] 4. Use Lightroom.
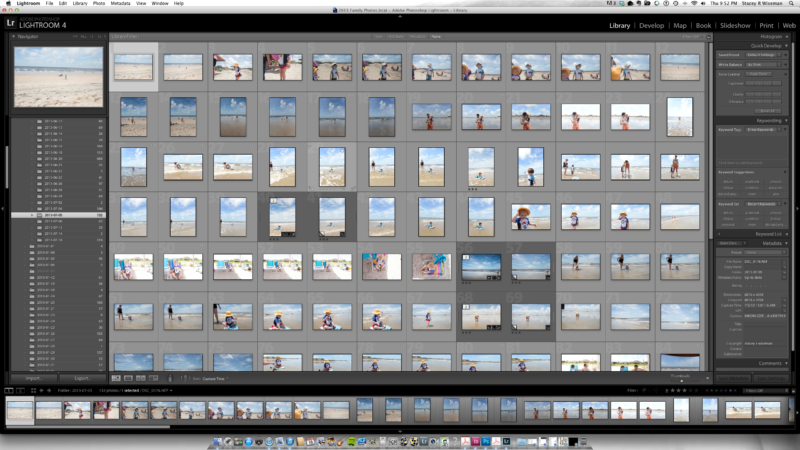
I love using this program. It has great organizational abilities plus you can edit your photographs – seamlessly in one program. If you do not have Lightroom and have an apple computer, iPhoto is a great solution to get started. The editing software is not as sophisticated as LR but it will definitely be what you need to stay organized and touch up your photos.
[divider] 5. Import your photos once a week.
I like to import my photos on the evening that I shot something. At the very least, make sure you import your photos off your card once a week. Don’t forget that ever important back-up (either online or on an external … or both!).
[divider] 6. Rate and edit your favorites on import.
After every import, I immediately go through and rate with 3 stars the photos that I love. Then I filter the photos to show only the 3-star photos. At that point, I figure out which ones to edit. If I have time, I’ll edit them all. If I end up having a lot of 3-stars, I’ll pick my favorites and edit those.
[divider] 7. Keyword.
On Sunday night, while I’m watching a TV show, I go through my photos and keyword the ones I want to go in my photo book. I use the keyword ‘photo book’. The key here is to pick something you’ll remember. You can also keyword where you were or who is in the photo.
[divider] 8. Create Smart Collections.
This is the crucial step. Create a Smart Collection to collect all of the keywording and tagging that you’ve been doing. Unfamiliar to smart collections?
Check out this video.[divider] 9. Once a month organize your photos.
Once a month, go through your smart collection and make sure all of your photos that you want for your photo book are cropped appropriately and edited the way you want. If you keep up with the steps above, this should not take a lot of time!
[divider] 10. Spend one night a month working on your book design.
Finally, take at least one night to import your photos into your book and work on the layouts. Even if you don’t get finished completely with the month of photos, you’ll have a good start and be way ahead of the game when the end of the year approaches.
[divider] Now it’s your turn! What is your favorite tip to staying on top of your photo book design?

by Stacey Wiseman | Nov 18, 2013 | Photograph, Photography Tip, Q&A
Question: How do you edit your photos?
Answer: So even though I had a difficult time getting Christmas card photos, I thought today I would show you how I edited my fall photos.
First, I want to stress, I’m not the best photo editor, but I’m happy to show you what I’m doing at the moment. Usually my editing is minimal and has to happen pretty quickly.
Here are my basic steps.
1. Adjust exposure.
2. Adjust white balance.
3. Adjust the tone curve.
4. Adjust any color saturations or luminance.
5. Apply any specific crop.
6. Apply a slight vignette.
Now with fall photos, I want to play up the beautiful fall colors. So here is an extra step I did with these photos that I do not typically do on my photos. And it’s a new feature in LR5 – radial filter. If you haven’t used this tool yet, I really like it!
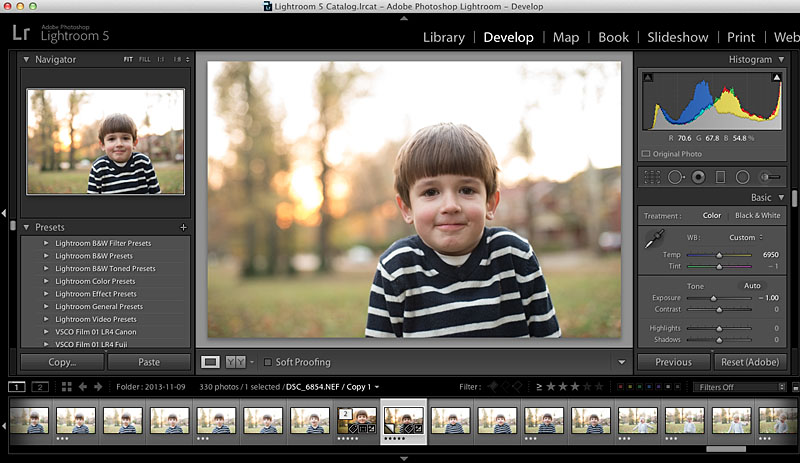
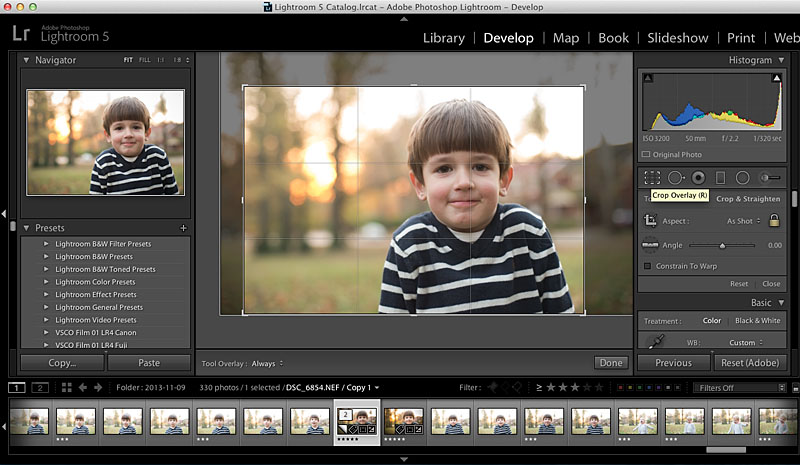
So let’s take a look at what I did for this straight out of the camera photo:
 The first step was to adjust my white balance and exposure.
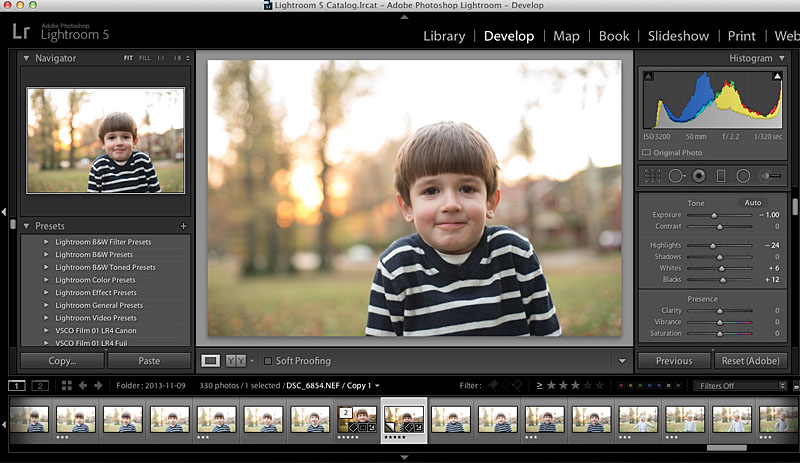
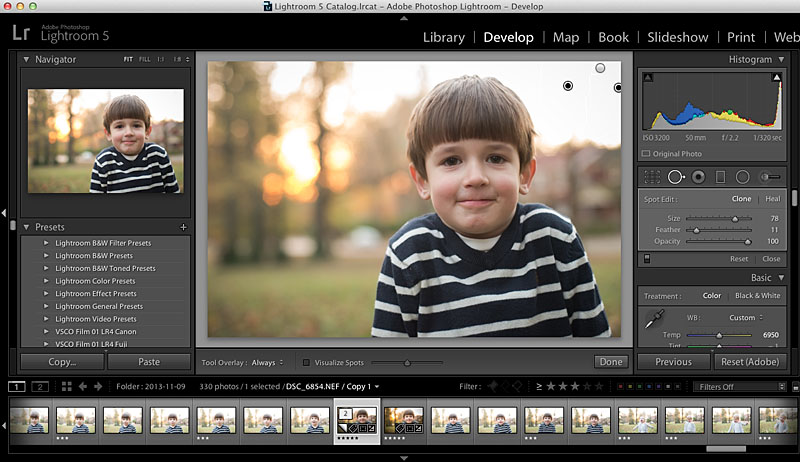
 Then I make some adjustments to the highlights, shadows, whites, and blacks.
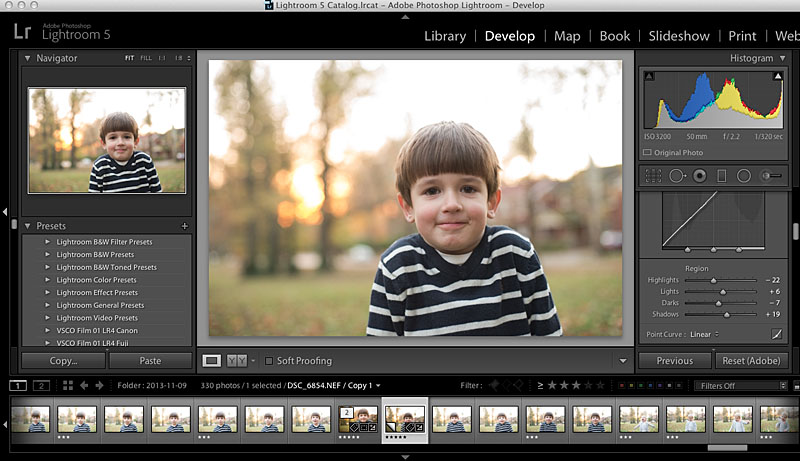
 Next up, the tone curve.
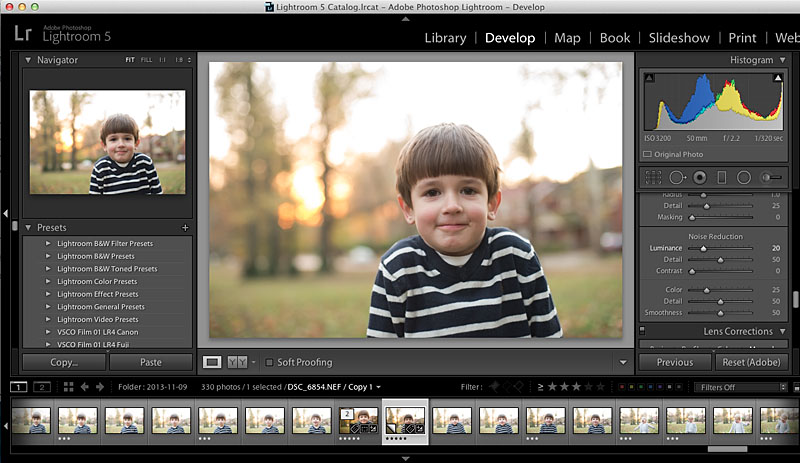
 Then a little Noise Reduction because even though this was outside, it was getting late and my camera was set to ISO3200.
 A crop…for this photo, I used the rule of third guide within Lightroom.
 Then I cloned out a few of the distracting elements in the background, to the right.
Next step, I get to use this awesome radial filter tool in Lightroom 5. This tool allows adjustments to be made, in this case the background, without affecting the subject. And you can invert it as well. So I wanted to lower the exposure and increase the saturation in the background. This plays up the fall-ness in the photo.
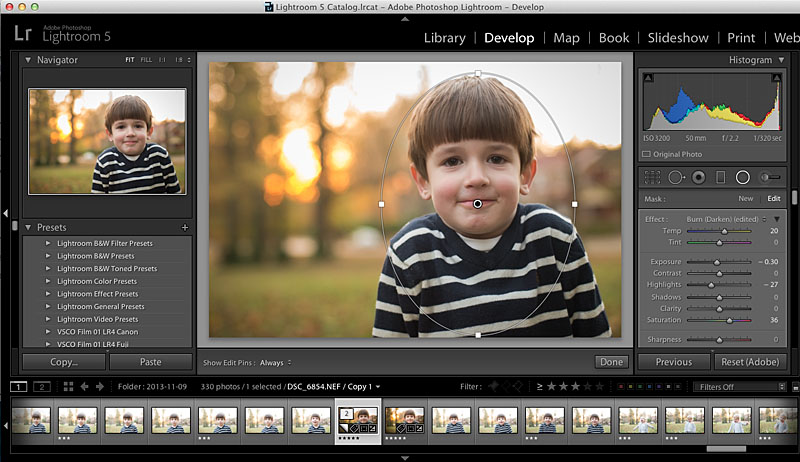
If you don’t have an earlier version of Lightroom, you can always use the adjustment brush to select the background. The radial filter is just a faster option!
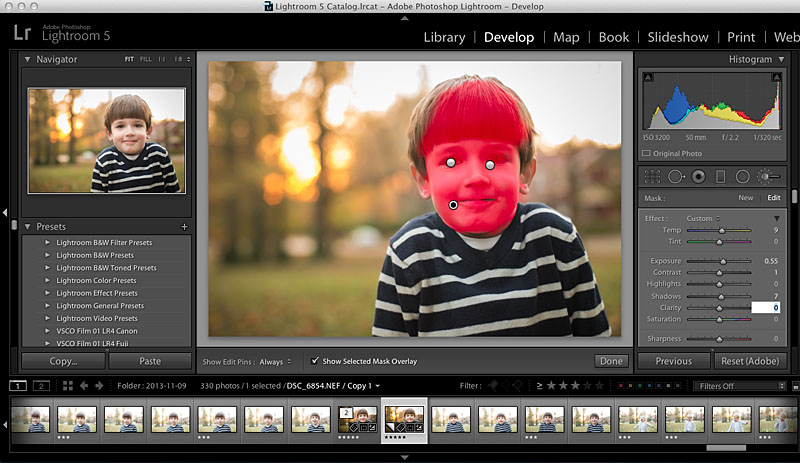
Finally, I make a couple more edits to his face using the Adjustment Brush tool. I lighten his eyes ever so slightly, reduce the circles under his eyes by reducing the saturation and add a little warmth and increase exposure to his face.
And there we have it! Here is my final photo…it’s not perfect but it’s definitely an improvement from where it started.

by Stacey Wiseman | Oct 19, 2013 | Q&A
Disclosure: Some of the links below are affiliate links, meaning, at no additional cost to you, I will earn a commission if you click through and make a purchase.
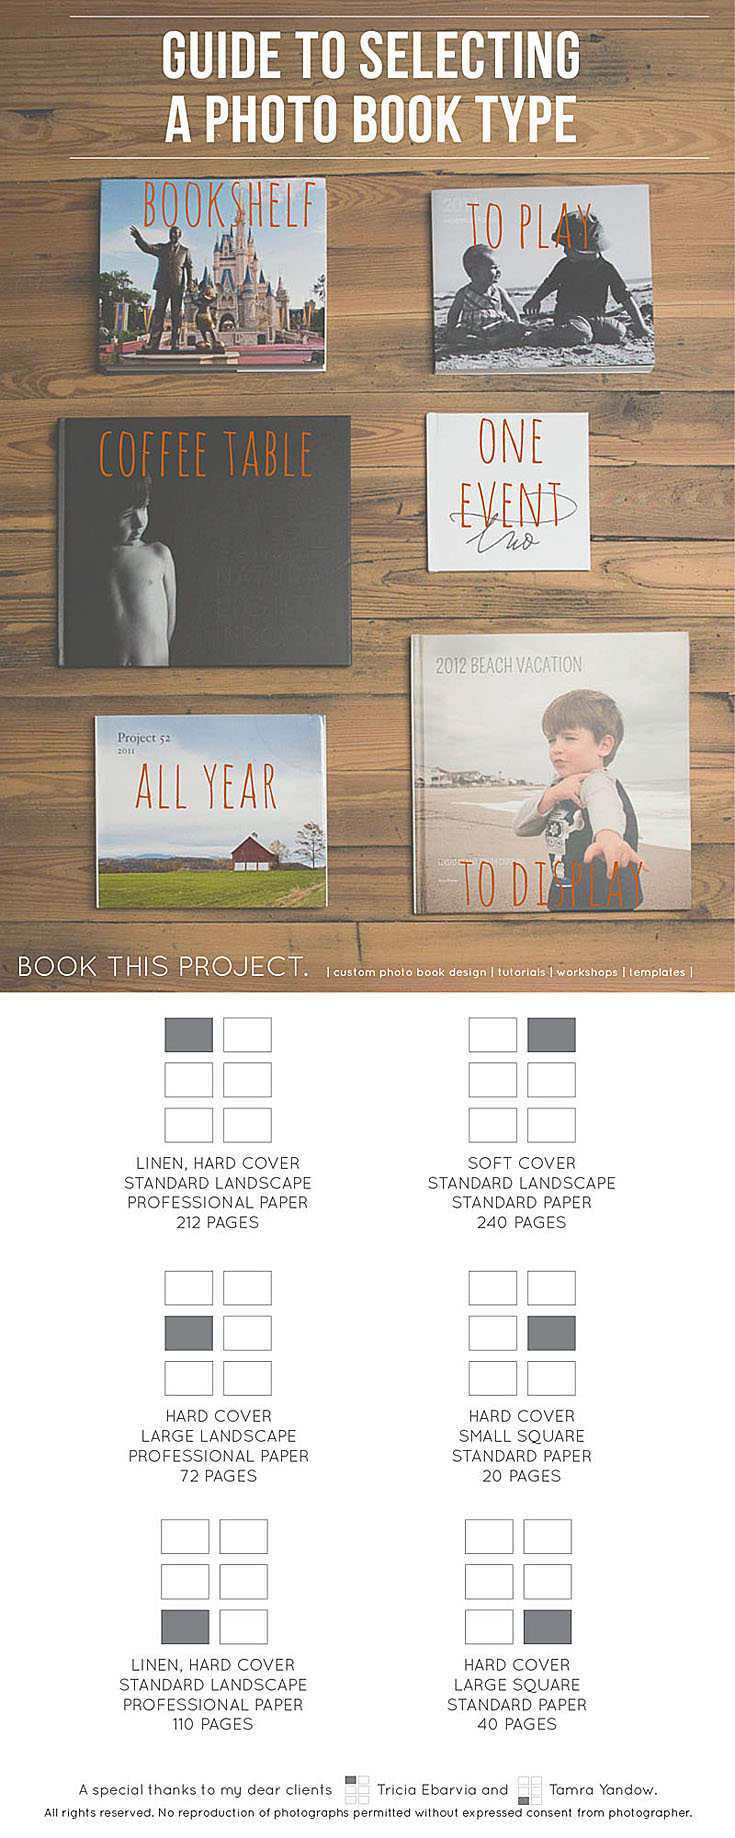
I’ve got a great Q&A for you today on how to get started and actually select the right type of book for your book project.
 How do I decide which type of book to use?
 There are a great variety of books out there…sometimes it can be hard to decide which book will be right for your specific need. Whether you have never made a book before and don’t know where to start….or always end up selecting the same book….here are a couple of great points to consider for your next book.
To Play – or – To Display
First Question: Is your book going to be for play or display?

 If you’re planning on your kids handling your book in a way that only kids can master, you know, rough with the pages, bending the corners, sippy cup in hand…you might want to consider a soft cover book. These are great alternatives to document your year and keep your kids entertained.
If you’re planning on creating a book more for display, you should design a book that is more professional looking with higher quality paper.
One Event – or – All Year
Next Up: Are you covering one event or your entire year?
 With only one event, such as a birthday, vacation, or christmas morning, it is easy to design a smaller, succinct book. This is also perfect if you want to include a lot of photos from your smart phone or point and shoot camera. You can easily bleed the photos on the page without having to worry about pixelated images.
For an entire year, chances are you will have a thicker book. Selecting a hard cover to support those pages is a good idea. Depending on the number of pages and your budget, it may make sense to use standard paper or upgrade to professional paper.
On the Coffee Table – or – On the Bookshelf
Finally: Where are you going to keep your book, on the coffee table or the bookshelf?
 A book on the coffee table wants to be a little bit larger, with professional paper and an intentional design. You should design a cover to really stand out and make visitors want to pick up this book and look through it.
If you are planning on a book resting on your bookshelf, take notice of similar types books on your shelf and match that with your photo book size. I tend to have a lot of standard landscape size books (at least in height) on my bookshelf, so it typically makes more sense for me to design standard landscape books.
And to top it off, I’ve got a great reference guide for you to pin and share. 😉
If you’ve got a question about your book, share in your comments below or send me an email!
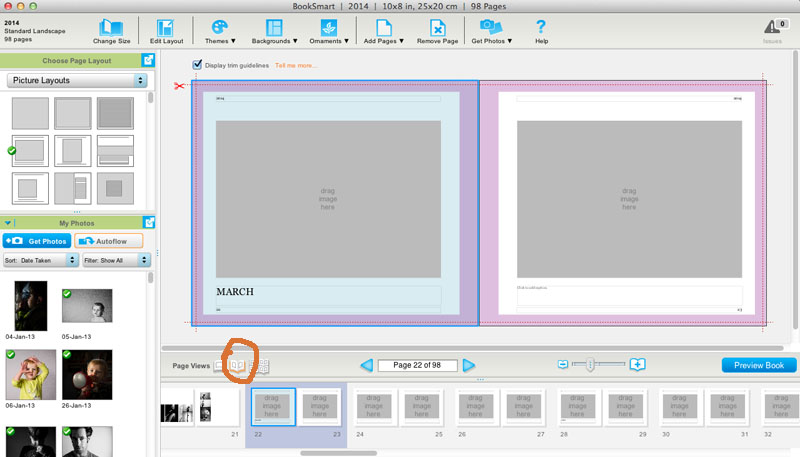
by Stacey Wiseman | Jul 19, 2013 | Photo Book Design Layout, Q&A
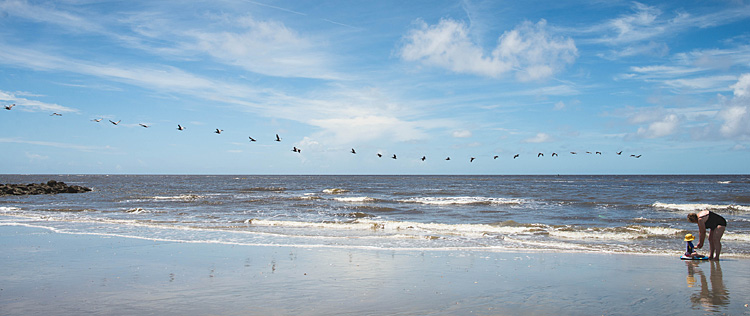
Yesterday, I showed you how I took some photographs on a crowded beach during our recent vacation.
Today, I want to show you how to incorporate your vacation photos into your annual family photo book.
Q: We just got back from vacation and I would love to put some photos in my annual family photo book. But I have a lot of photos. How do I decide which photos to use and how to place them in my book?
A: Yes! You should definitely put some of your vacation photos into your annual photo book. But it is easy to see how you could get overwhelmed with the number of photos…I have a couple of suggestions for you.
1 : Decide how many pages you want to include in your book.
This depends on how many pages are in your book – and – how long your vacation was.
If you have a 400 page photo book, it is easier to fit more vacation photo pages in your book. If your annual photo book is only 100 pages, and it was a week trip (or less), I recommend only one spread. (Unless you don’t take as many photos throughout year as I do.)
My annual photo book is 240 pages with about 20 pages per month. So I’m going to use 2 spreads (4 total pages) for my book.
Another family book I have designed, they took a very long vacation in June, so I devoted the whole month to their vacation.
2 : Decide how many photos you want on these pages.
Once you know the target number of pages, you can decide how many photos you want to include. Use a rating system in order to narrow down your photos. Keep in mind the orientation and the content of the photos. You may only want to show certain photos that really tell the story.
If you have so many more photos that you can’t decide, design your own vacation book. That way you can include a lot of your vacation photos and only include your very favorite in your annual family book.
3 : Decide on the look of the layouts.
If you are familiar with this blog, you know I recommend designing your layouts while you are selecting your photos. How can your photos inform your layouts? Are they mostly horizontal? Vertical? Do you have a couple of standout photos? Or are you wanting to collage a collection of them together? Are they color? Black and White?
For my recent vacation, I had a lot of horizontal photos but one main vertical photo of my son on his boogie board. I decided I wanted to find one horizontal photo that could work as a full spread bleed. Then I would use the second spread as a collage, mixing in my vertical photo, with some beach portraits and another fun photo really showcasing the beach.
Here is what I came up with.
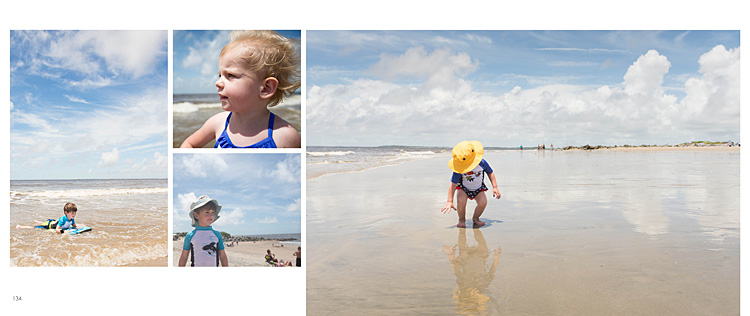 I hope this Q&A has helped you with how to incorporate vacation photos into your book.
Leave a comment below letting me know where you went (or are heading) for your vacation this summer!
And stay tuned…in August I hope to have a custom book design option for your vacation photos.
by Stacey Wiseman | Jun 19, 2013 | Q&A
A while ago I received a question regarding preparation for a photo book. Even though this is not actual book design question, it is a foundational question for what makes photo books really work – the photographs.
Question:
How much sharpening [do you do] for your book? One frustration for me is that I will get a photo looking good and sharp but then when the book comes back it looks soft. I have looked on the blurb forum and there is so much technical info re the colour proofing that my eyes just glaze over!! Oh and I have tried to crop the photo to the exact size of the blurb template vs just using the blurb resize tool and there doesn’t seem to be that much difference in terms of sharpening.
Answer:
I’m not sure I have a definitive answer for you but I will share what works for me.
This is one of the hardest things to show / illustrate / test. Also, you may have personal preferences or standards for your photos that are different than mine.
So the best idea is to test specific approaches and see what works for you until you are satisfied.
I was glad to hear you say you tried sizing to the photo to the actual photo box versus using their slider to increase the photo within the box. That is what I was going to suggest.
I typically size my photos @ 300 ppi at the size I want to use in the book. But if you have already tried that…another thing I do in Lightroom is sharpen for print with matte paper when I export. I think I have had better luck with that.
I also use Blurb’s pro-line paper which may impact the quality of the printed photo.
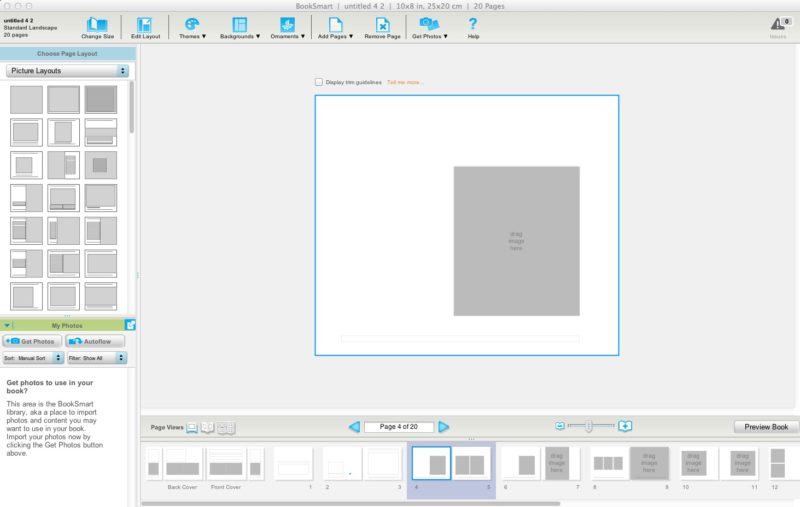
I will say, I had better quality with the book I designed with BookSmart or InDesign compared to the Lightroom 4 Book Module. But I’m guessing Blurb is continually working to improve the book making qualities within Lightroom. I’ve heard they’ve already made improvements within Lightroom 5.
Here is how I export the photos for my book. I’m not guaranteeing success for your books…but so far…this method has worked for me.
First, I export to a specific location at 300ppi with sharpening for print with matte paper. I tend to size my photos to what I have in my layout but if I’m unsure, I will export at the largest size possible. You could also leave the size area unchecked and this will export the original photo at 300ppi.
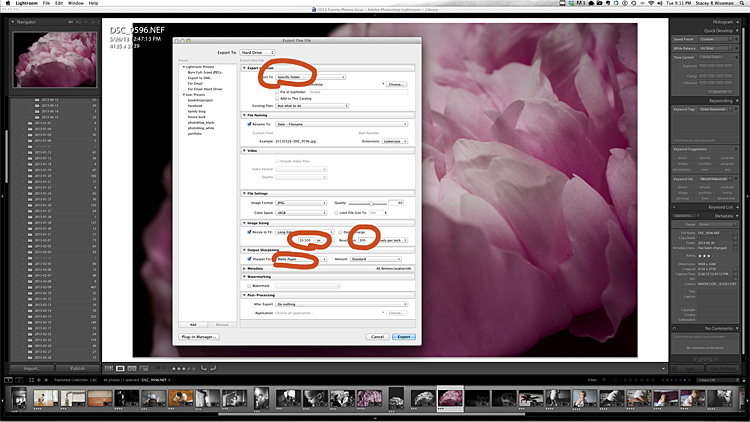
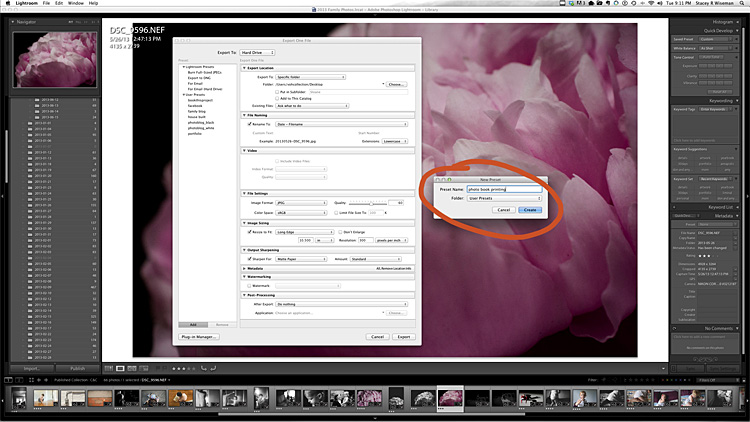
[divider] When I have these areas established, I will go to the left and select, Set a New Preset. This will save all of the settings for future use. This will likely change for each book project, but it’s easy to adjust it as needed.
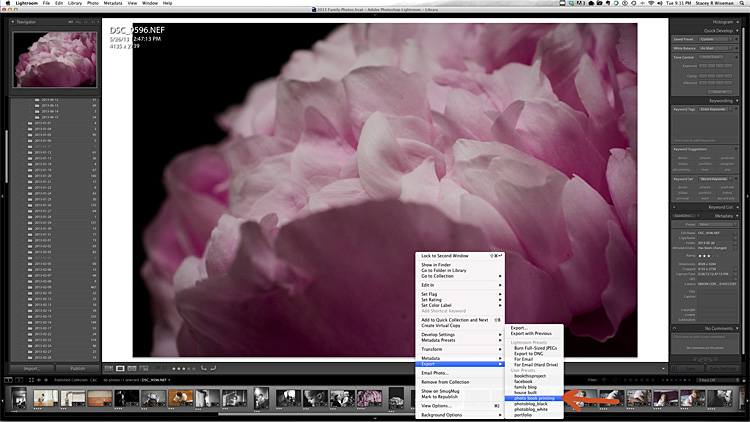
[divider] Now, whenever I have a photo I want to go in my photo book, I just right click on the photo, go to export and then select the preset established for my book.
by Stacey Wiseman | May 14, 2013 | Photo Book Design Layout, Q&A
Question:
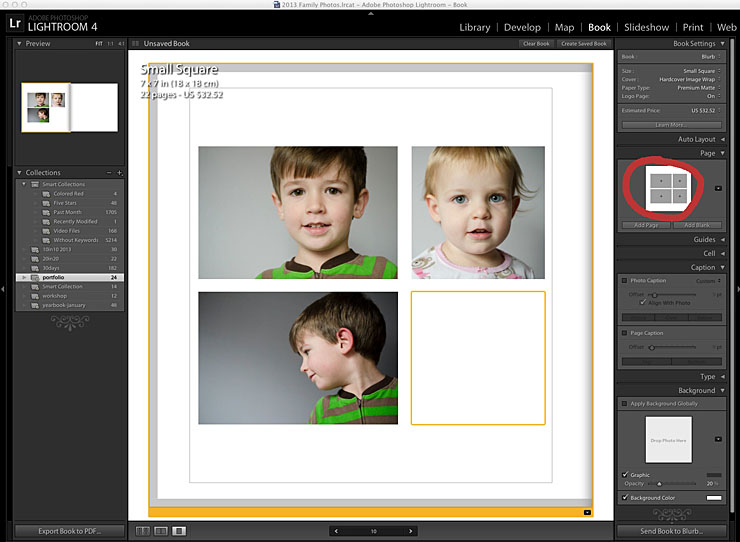
I’m using LR4 Book Module to design my book. I’m curious if there is a way to use one of the provided page layouts and take one of the picture squares to use it as a text box? I’d love to just pop my text into one of the picture squares from a page layout that doesn’t have a text area. I feel like this should be easy to insert text where I want but I cannot figure out how! Any insight on this would be so so appreciated!
Answer:
Great question! I agree, text is not the easiest to include in the Book Module. This may be something they are fixing in the upcoming LR5 release.But it is possible. Here’s what I did! I selected a 4 photo page:
Then instead of filling the fourth photo, I selected the photo above (top right) and selected “Caption.”
This is the key, I adjusted the offset in order to get the text to line up with the other photo.

Next, you can adjust the style/size of font to suit your book.
There you have it! A simple way to cleanly add text to your layouts using the LR4 Book Module. Do you have a question about how to use the Book Module? Leave a comment below and I’ll address it in an upcoming post!
by Stacey Wiseman | Apr 20, 2013 | Description, Photo Book Design Layout, Q&A

[divider] Are you wanting to design your own photo book but have no idea how to begin?
You don’t even know how to select the best photo book company or program to use. This month’s Q&A will definitely help you out!
How to choose which photo book program should I use?
This is a great question and actually really influences the type of photo book you want … and the design process itself.
Are you looking for a no-fuss process? Do you want the fastest way to design a book? Are you looking for some creative choices but don’t want to be overwhelmed? Do you love having complete control?
Do you want a lot of photos in a grid layout? Do you want fewer photographs in a more specific layout?
Do you want to start with a clean / blank layout (think black or white backgrounds) or do you want a bit of design?
Every single one of these questions influences which company, process and program you should use.
The best single piece of advice I can offer: Spend a little time right now to decide what you want before you download a program. You’re more likely to get the results you want in the end, if you start with an intelligent choice in the beginning. Here are some options to consider.
First, start with the photo book company.
If you’re looking for a template to add photos to, check out Snapfish, Shutterfly or TinyPrints.
If you’re wanting to start with a basic background, white, black or solid color, look into Blurb, My Publisher or AdoramaPix Books.
How do you decide? Look for the specific design templates, page layouts and/or finish options that speak most to your vision. Look at the cover, the binding, the paper options.
[divider] Second, think about the design control you want to have.
Does the photo book company you are considering have an autoflow option (if you want a quick design) or a custom layout option (if you want more design control)?
I’m more familiar with Blurb so I wanted to outline the three options they provide to design a photo book.
1 – Bookify: This is purely an online, cloud-based, program. It does not have an application that you download to a desktop. This is great if you plan on working from various computers. You can not customize the page layouts and have to use the pre-designed templates. For simple books, chances are you’ll find what you want. These are great for autoflow books (where the program places the images for you automatically), especially if using instagram or facebook pics.
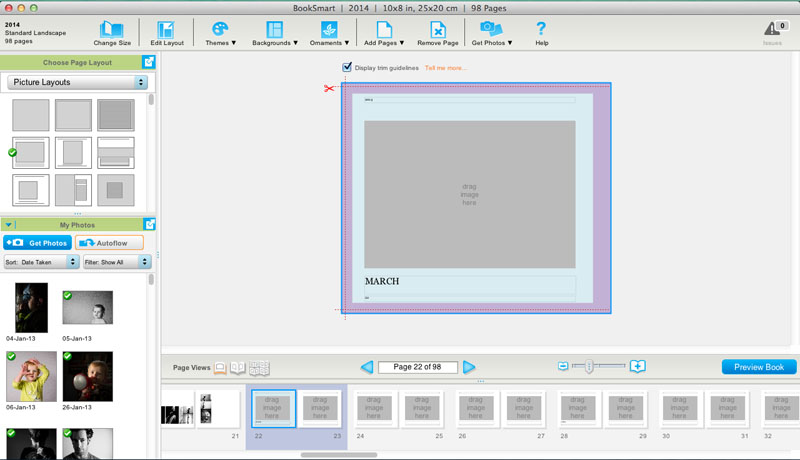
2 – BookSmart: This is an application that you download to your desktop. There are a variety of more advanced options that you can use to design layouts. There is an autoflow feature but you can also customize the page layouts. There are some restrictions to text – for instance size and rotation. But for the most part, you can be design a sophisticated book. There are layout options for full spreads (left and right side of the page) which is an awesome feature to have.
3 – Adobe InDesign Plug-in: Blurb provides a plug-in to be installed into Adobe InDesign in order to design photo books. All of the margins are established with the plug-in. You simply design what you want and upload it to their site. This option provides the maximum level of design and creative control. The only restriction is your knowledge and understanding of InDesign. I’m offering an upcoming workshop to educate how to design gorgeous books (and other documents) using this plug-in and InDesign.
Third, factor in cost. You don’t want to design your book and then realize the price is too high for you to order your book. Understand what to expect from the beginning.
There you go! My answer to help you select the perfect photo book program for you photo book project!
Do you have a specific request and want to hear my recommendation? Leave a comment below and I’ll let you know what I think may be the best option for you!
by Stacey Wiseman | Feb 21, 2013 | Photo Book Design Layout, Q&A
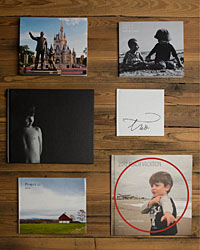
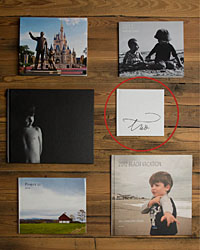
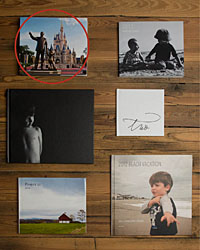
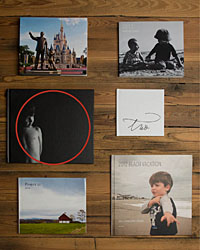
Selecting photos is one of the first steps to photo book design. The photographs are what really provide the story, backbone and purpose for your photo book. And selecting photographs can be one of the first stumbling blocks to actually completing your photo book. That is the focus of this month’s Q&A!
 How do you select photos for a photo book?
[divider]
 1. Select photos that you immediately love.
You should select photos that you melt your heart when you see them. They could be technically great photos, with tremendous clarity or use of light. Perhaps they have an artistic creativity in its composition or content that immediately draw you in. Or, they can be photos that you perfectly capture the essence of your loved one or a moment that you want you want to freeze in time forever.
Of course, a particular photo addresses all three of these qualities, you will want to feature this photo as large as you can in your photo book.
2. Select photos that tell the story.
If your photos document a specific event or story, use an editorial eye to select the minimum number of photos you need to really tell the story. An example, if you want to include two pages in your photo book to feature a trip you took with your family to an amusement park, what are the necessary photos you need to tell the story of the day? I’m assuming you will have a lot of photos from the day. Maybe getting your tickets, riding roller coasters, driving bumper cars, eating lunch, watching a performance, and indulging in an afternoon snack. It’s important to think about what you want to describe from the day and what photos you need to really tell the story.
You may have a series about riding the roller coaster. Select 3-5 photos from this set. You may have four photos that you want to use to describe the morning (arrival), late morning, lunch, and afternoon. Finally, you may have a photo that you want to feature as a 5×7 somewhere throughout the spread. For this select your favorite aspect of the day; then the favorite photo to show that moment. It could be a portrait with a great smile and a toy that they received while at the park.
3. Select photos for their orientation.
When selecting photos, it is important to keep in mind the orientation of the photos you are selecting. Picking 3 horizontal photos and 1 vertical photo forces a very different layout from 4 horizontal photos that can all go in a square. Nothing is off-limits, it just helps to understand the concept of orientation early on. Often times, I like to layout photos in a square (all horizontal or all vertical) in groups of 4 (2 rows of 2) or 9 (3 rows of 3). This sets the orientation and the quantity so you know right away what you are looking for when your picking out photos.
4. Select photos for their processing.
Another preference I have, is to select photos with similar processing styles on a spread together. This means, all color photos on one spread and black and white on another. If you have three photos from a day that are black and white, stick with those 3. Now all you have to determine are the sizes.
5. Select photos for the quantity.
Similar to number 3, determining the quantity of the photos you want to capture an event or tell a story is a crucial first step to selecting your photos. This helps to define and limit what you are choosing. For some days, you may really only love 1 photograph. Other days, you may 300 photos. You could do 9 small photos on one page and 4 medium sized photos on another. This way, you will use the quantity of 13 to select the very best photos to include.
All of these tips will help guide you as you are looking through your catalog or folder of photos to determine what photos you should use in your photo book.
Let me know in the comment below, what quality makes you immediately love a photo!