PBDW
YOUR CREATIVE VISION.From taking the photos to designing your photo book. Get creative while printing your photos. Learn to expand your vision and design a photo book you love. Right now, you’re sitting with thousands of photos stuck on your hard drive. You know...
10 Reasons you need my Photo Book Design Workshop
This week, I released my Photo Book Design Workshop pre-lesson and everyone is diving in and defining their vision.
This Monday, the workshop kicks off and I want to make sure you don’t miss out.
So, how do you know if this workshop is right for you?
I’ve got 10 great reasons below.
1. Sequence
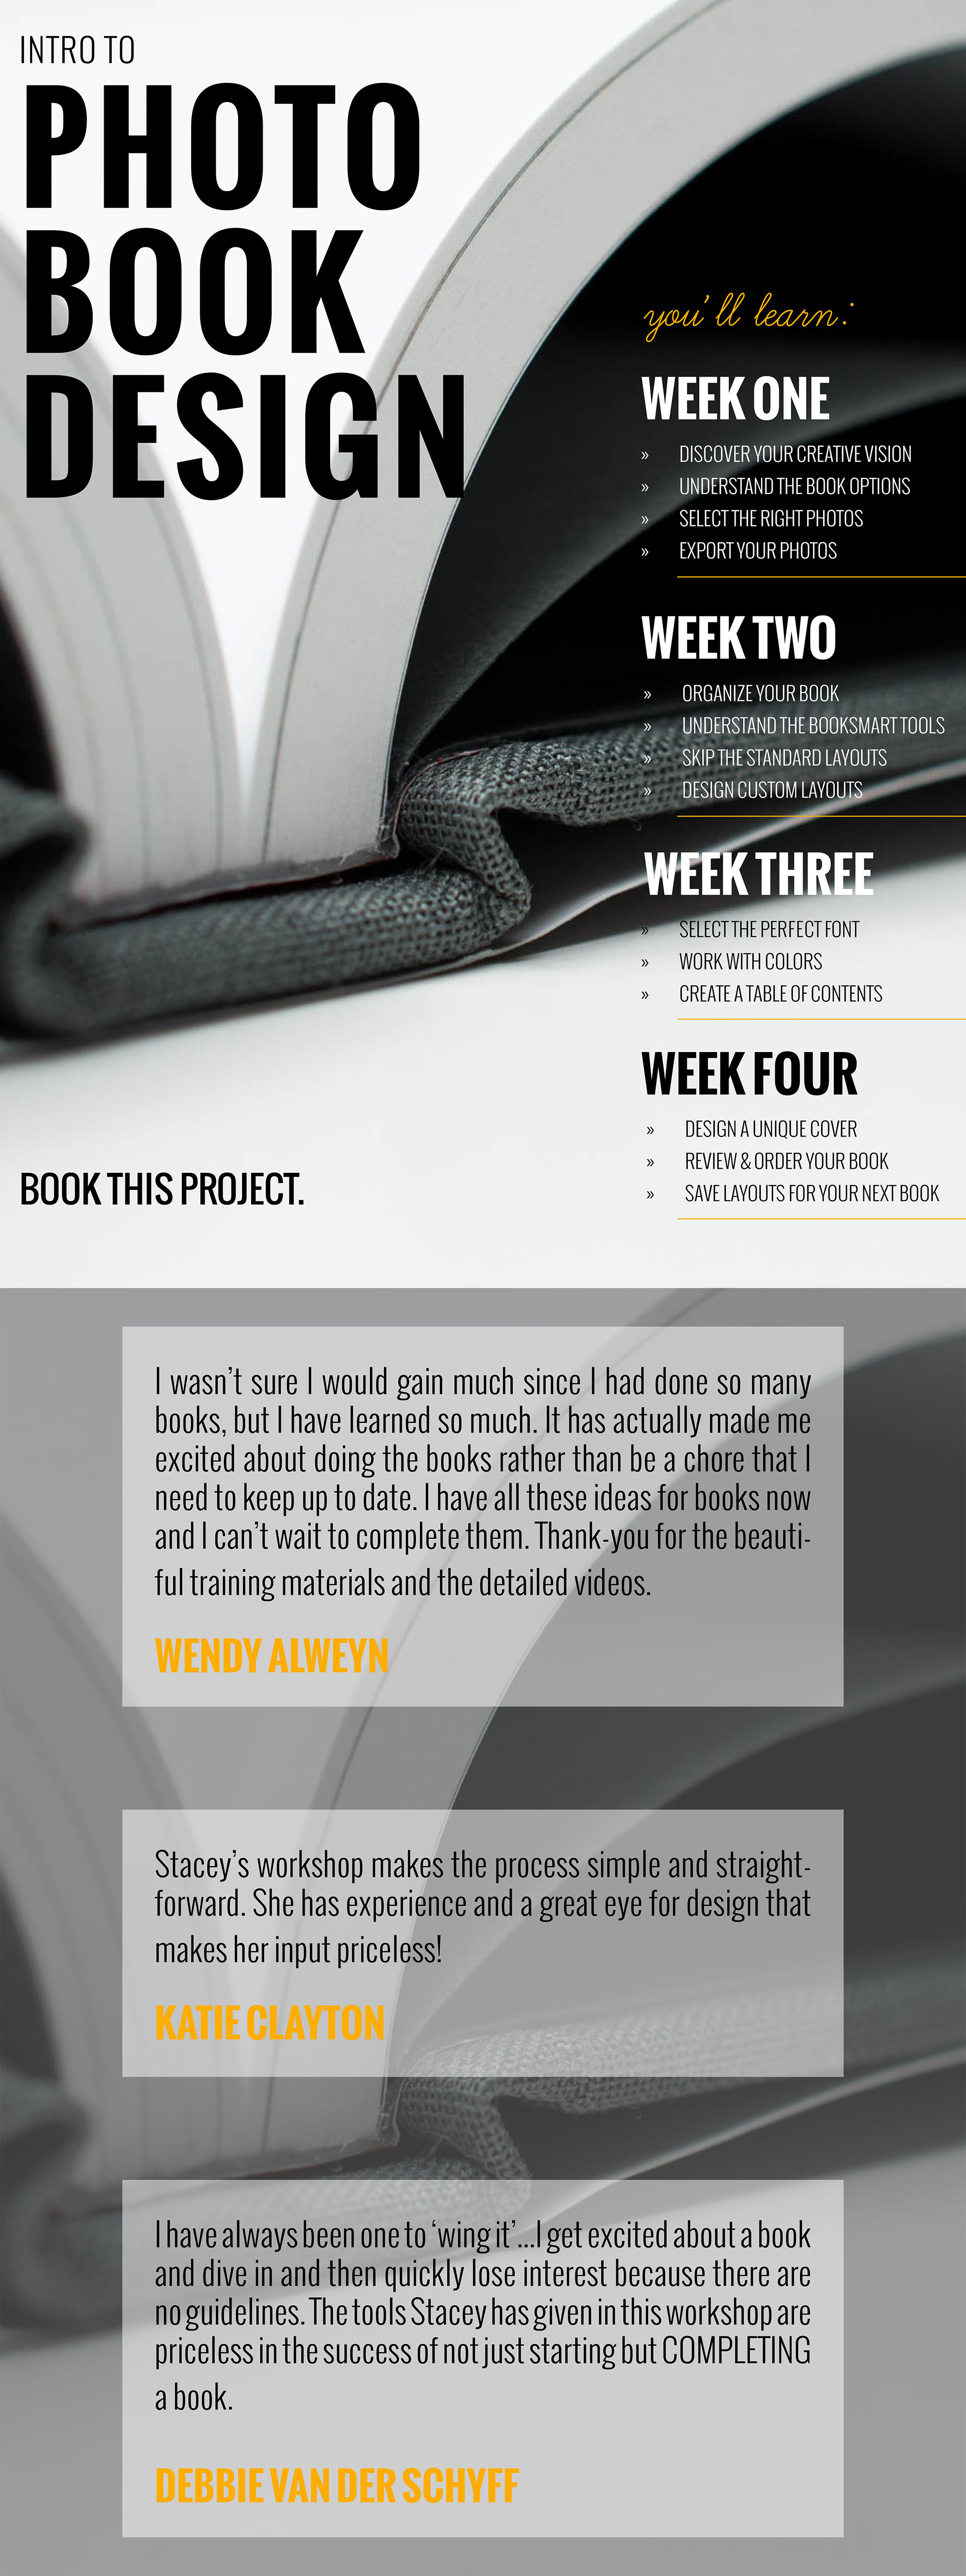
I’ve organized all of my insights, advice and recommendations into a tested and specific order so you know what to do and when to do it. I’m not just telling you how you make a photo book, I’m outlining a process, an efficient workflow, that you can apply to any book project.
2. Results
With every workshop, I create an encouraging environment for you to make progress, and hopefully finish your photo book.
3. Convenience
You don’t have to endlessly search on the internet for advice or inspiration. I’ve packaged all of the pertinent information in one convenient location.
4. Overwhelm
Making a photo book can be overwhelming. With my guidance, I’ll provide clear strategies so you can be decisive and feel empowered (not overwhelmed) by the process.
5. Missing Pieces
Sometimes you don’t even know what to ask. Or what exactly you’re looking for. I promise to share insights and tools that will help you save time and improve your book. Yes, even for people who have made plenty of photo books before… they still walked away with valuable insights.
6. Accountability
By participating in a workshop, you’re making a commitment to yourself to learn and accomplish something you’ve previously struggled with. There are 4 ways my workshop holds you accountable: my actionable lessons, being motivated by your fellow participants, the ability to ask me any questions and receiving feedback on your work.
7. Me
This one is a little weird for me to share, but it’s true – participating in my workshop provides you with unprecedented access to my thought process and workflow. You’ll see how I work plus get views of entire photo books I’ve designed.
8. PDF Design
I don’t just type out the lessons and add photos. I spend a lot of time focusing on the design of my material and love to make small tweaks every year to make sure the lesson is easy to read, organized and beautiful.
9. Facebook Group
After participating in the workshop, you’ll have access to my Mastermind Group, which includes a private Facebook group of others working on their books. Participating in this group will help you stay focused and finish your book project….or start a new one!
10. Upcoming Projects
Every summer, I like to come up with a fun project to stretch your creativity – with your photos and designing a photo book. However, these projects are not instructional. To participate in this project, you’ll want to already know how to make a book using the BookSmart (or BookWright) software.
Plus, as of right now, this is my only scheduled 2016 run of the Photo Book Design Workshop – so now is your chance to learn!
It’s also important to know if this workshop is not for you. This Photo Book Design Workshop is probably not right for you if…
You take less than 500 photos a year.
You prefer to print your photos as 4×6 prints.
You have absolutely no extra time to devote to learning a new task.
You are completely satisfied in your ability to design photo books.
You have an efficient workflow to stay on top of your culling, editing, and designing.
You love the standard layouts or designs in these photo books.
You’d rather have me design your photo books for you.
You already use InDesign to design your photo books.
I’ve got more information here but if you’re ready to sign up you can head over here.
The workshop kicks off this Monday, March 20, 2017!
Here’s a preview of the Pre-Workshop Lesson that has already been posted.
50 Books to Read in Kindergarten: Design Tips
This week’s design tip from a children’s book is a little more complicated unless you use InDesign (or a whiz with Photoshop or Illustrator). But….I’m guessing there are a few online programs that make this tip possible.
The next children’s book all kindergartner’s should read is In the Small, Small Pond by Denise Fleming.

And here’s the design tip!

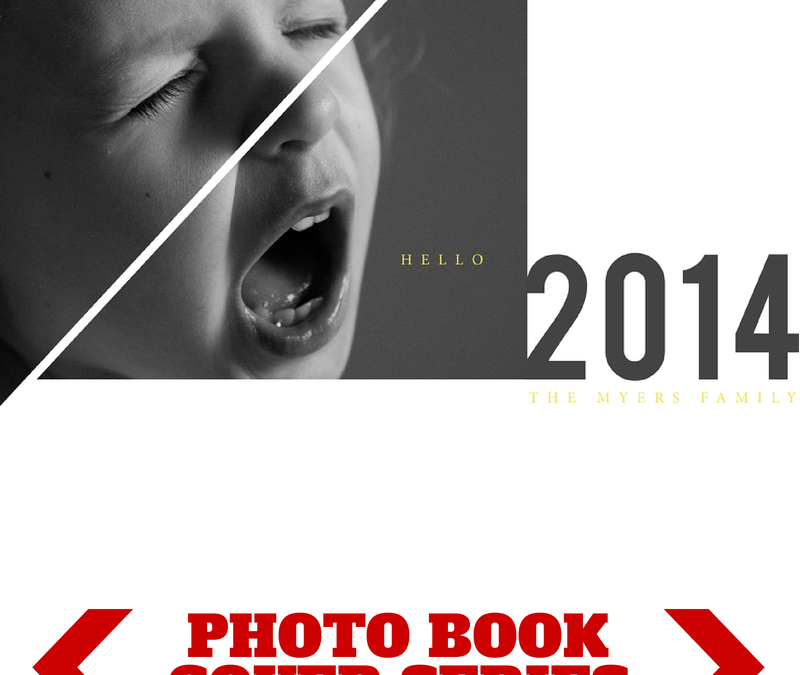
2014 Photo Book Cover Design Series: Shout
Hello 2014!
I’ve got a fun photo book cover design today! And it starts with the photo. We all know it’s common for children to have their moments of screaming and crying. Here’s your opportunity to photograph this moment and turn it into something creative for your photo book cover.
I broke up the photograph using triangular shapes via the pen tool in InDesign. This added more interest to the photo but definitely not necessary. The photo in a rectangular box can stand on it’s own too.
Pairing this photo with a bold font for the year and a small, classic font in a stand-out color (yellow) helps to make this dynamic cover design down to each detail.
Let me know in the comments below what you think!

work with me
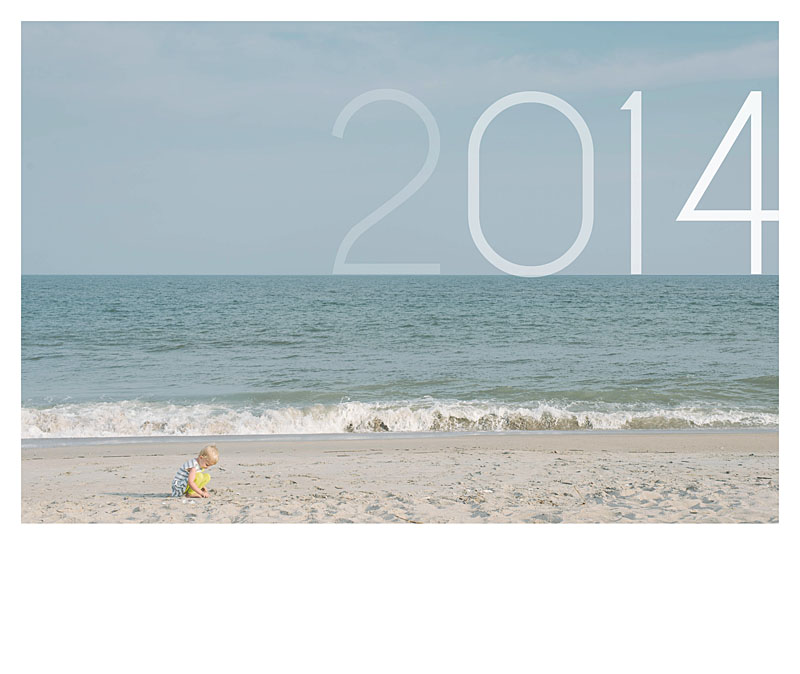
It’s time to print your photos….in style. Whether you design on your own or want me to design for you, your photos deserve to be printed. I work with creative moms who carry their DSLR everywhere capturing everyday moments – skinned knees, silly...2014 Photo Book Cover Design: Horizon
This photo book cover places the text announcing the year, right at the horizon line. The text becomes more and more opaque as it gets to the last digit. If you wanted to be even bolder, you could make the transparency/opacity even greater or use a gradient tool in Photoshop or InDesign to achieve a more seamless look.
The cover title in this case, balances out the subject who is in the lower left corner of the photos. Plus it really draws attention to the horizon line – which I find so appealing in beach photos.
Happy New Year!!!!

[divider_flat] Happy New Year to you all!!!
I have exciting plans in store for 2014! If you want to see something on this blog, leave a comment below or better yet, fill out my very brief survey! 😉
One big change, I’m now hosting my photo book design workshops over at The Photographer Within. This is a great place to learn and talk about photography. My Intro Photo Book Design Workshop kicks off on January 20, 2013. I’m also planning on leading my Advanced Photo Book Design Workshop (on InDesign) there as well as a brand-new and very exciting new type of workshop!!!
If you finished a Project 365, I’ve got a great template available for you (to use with Blurb BookSmart).
Here is what I’ve been busy with over the last year. If you would like to a tutorial on how I created this video, leave a comment below. I’m happy to update my tutorial from last year with revisions I made during this video!
I hope you had a great 2013 and wish you the best in 2014!!!
Cheers!
Stacey
Q&A: How do you sharpen photos for a photo book?
A while ago I received a question regarding preparation for a photo book. Even though this is not actual book design question, it is a foundational question for what makes photo books really work – the photographs.
 Question:
How much sharpening [do you do] for your book? One frustration for me is that I will get a photo looking good and sharp but then when the book comes back it looks soft. I have looked on the blurb forum and there is so much technical info re the colour proofing that my eyes just glaze over!! Oh and I have tried to crop the photo to the exact size of the blurb template vs just using the blurb resize tool and there doesn’t seem to be that much difference in terms of sharpening.
 Answer:
I’m not sure I have a definitive answer for you but I will share what works for me.
This is one of the hardest things to show / illustrate / test. Also, you may have personal preferences or standards for your photos that are different than mine.
So the best idea is to test specific approaches and see what works for you until you are satisfied.
I was glad to hear you say you tried sizing to the photo to the actual photo box versus using their slider to increase the photo within the box. That is what I was going to suggest.
I typically size my photos @ 300 ppi at the size I want to use in the book. But if you have already tried that…another thing I do in Lightroom is sharpen for print with matte paper when I export. I think I have had better luck with that.
I also use Blurb’s pro-line paper which may impact the quality of the printed photo.
I will say, I had better quality with the book I designed with BookSmart or InDesign compared to the Lightroom 4 Book Module. But I’m guessing Blurb is continually working to improve the book making qualities within Lightroom. I’ve heard they’ve already made improvements within Lightroom 5.
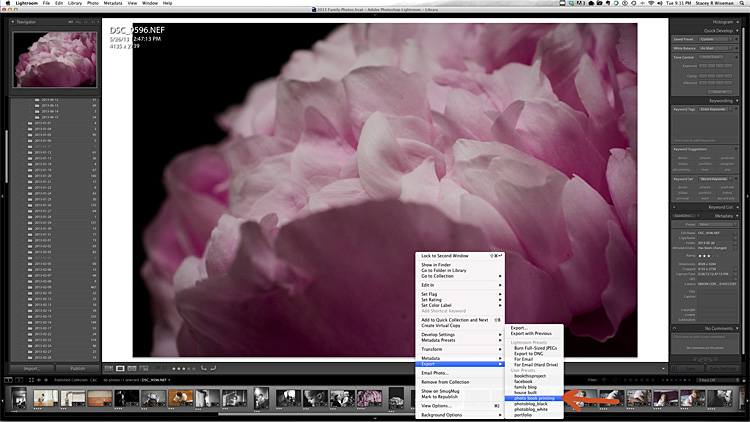
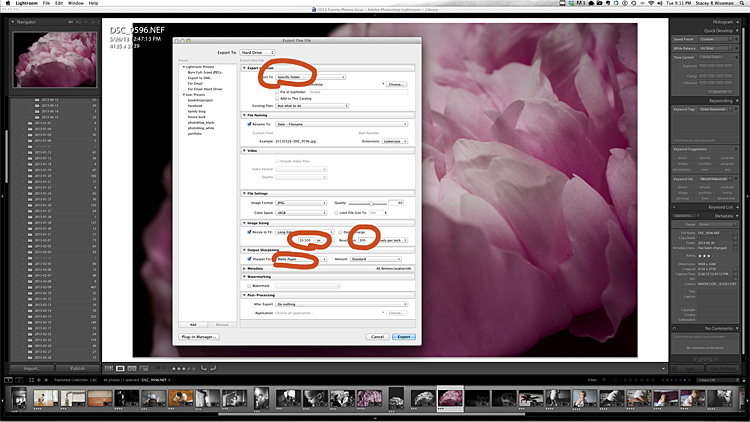
Here is how I export the photos for my book. I’m not guaranteeing success for your books…but so far…this method has worked for me.
First, I export to a specific location at 300ppi with sharpening for print with matte paper. I tend to size my photos to what I have in my layout but if I’m unsure, I will export at the largest size possible. You could also leave the size area unchecked and this will export the original photo at 300ppi.
[divider] When I have these areas established, I will go to the left and select, Set a New Preset. This will save all of the settings for future use. This will likely change for each book project, but it’s easy to adjust it as needed.
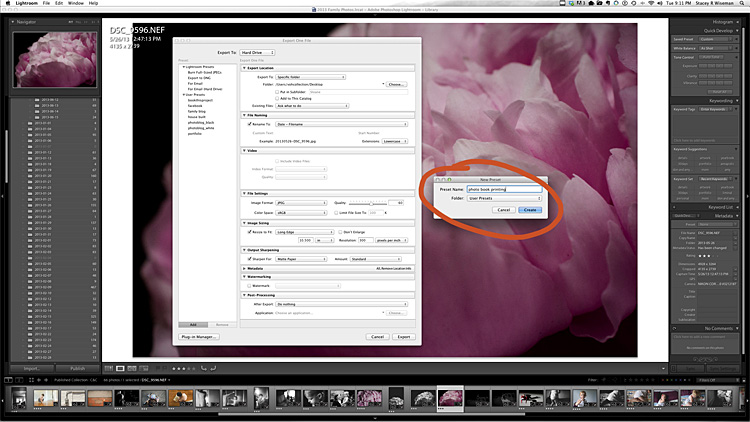
[divider] Now, whenever I have a photo I want to go in my photo book, I just right click on the photo, go to export and then select the preset established for my book.